Why Not Using Cloudflare Dashboard?
With curl + Cloudflare API, you can run activated/deactivated “under attack mode” easily. And it will be faster than using Cloudflare dashboard.
Lists Tools You Must Installed & Setup
You must get Cloudflare API Key & here is variable that I using in this tutorial
a. CF_ZONE_ID = Cloudflare Zone ID
b. CF_EMAIL = your Cloudflare email
c. CF_API_KEY = your cloudflare API key
d. CF_RULE_PAGE_ID = your page rule ID. Because we only change 1 domain page rules, not all domain/subdomain in our Cloudflare account.
How To
- Get existing page rule. Don’t forget to write down page rules ID you want to update your “security_level”
curl -X GET "https://api.cloudflare.com/client/v4/zones/$CF_ZONE_ID/pagerules?status=active&order=status&direction=desc&match=all" \
     -H "X-Auth-Email: $CF_EMAIL" \
     -H "X-Auth-Key: $CF_API_KEY" \
     -H "Content-Type: application/json"

Write Page Rules ID & Change That security_level
You can make the output readable using json_pp
curl -X GET "https://api.cloudflare.com/client/v4/zones/$CF_ZONE_ID/pagerules?status=active&order=status&direction=desc&match=all" \
     -H "X-Auth-Email: $CF_EMAIL" \
     -H "X-Auth-Key: $CF_API_KEY" \
     -H "Content-Type: application/json" | json_pp
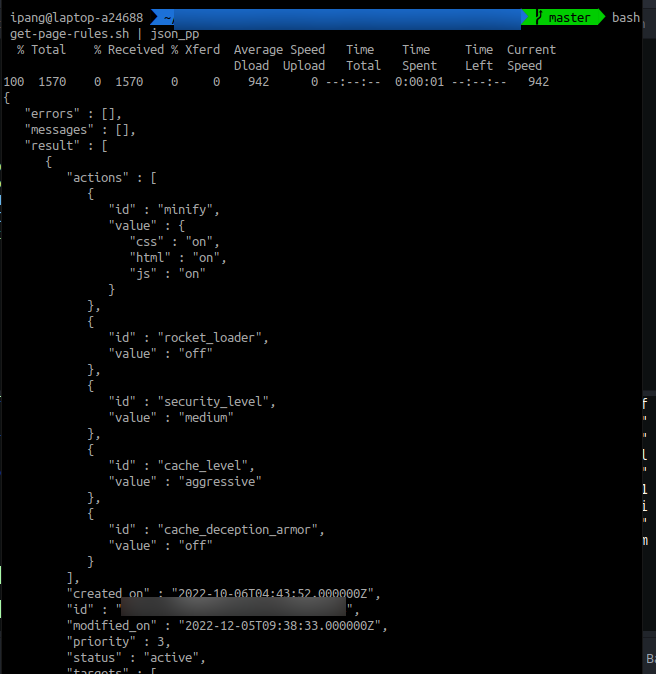
It become readable
- Since I got existing page rule, I just need to update “security_level” from medium to under_attack, to activate under attack mode
Here is my updated page rules (pretty json version)
{
  "targets": [
    {
      "target": "url",
      "constraint": {
        "operator": "matches",
        "value": "yourdomain.com/*"
      }
    }
  ],
  "actions": [
    {
      "id": "browser_check",
      "value": "on"
    },
    {
      "id": "minify",
      "value": {
        "html": "on",
        "css": "on",
        "js": "on"
      }
    },
    {
      "id": "security_level",
      "value": "under_attack"
    }

  ],
  "priority": 1,
  "status": "active"
}
You can make pretty/compress/minify json using jsonformatter.org .
Lets change the security_level to under_attack mode
curl -X PUT "https://api.cloudflare.com/client/v4/zones/$CF_ZONE_ID/pagerules/$CF_RULE_PAGE_ID" \
     -H "X-Auth-Email: $CF_EMAIL" \
     -H "X-Auth-Key: $CF_API_KEY" \
     -H "Content-Type: application/json" \
     --data '{"targets":[{"target":"url","constraint":{"operator":"matches","value":"yourdomain.com/*"}}],"actions":[{"id":"browser_check","value":"on"},{"id":"minify","value":{"html":"on","css":"on","js":"on"}},{"id":"security_level","value":"under_attack"}],"priority":1,"status":"active"}' |json_pp)`
Bash Script Version
- Create new file, call it .env
CF_ZONE_ID=Cloudflare Zone ID
CF_EMAIL=your Cloudflare email
CF_API_KEY=your cloudflare API key
CF_RULE_PAGE_ID=your page rule ID
- Create bash script file, name it activate-under-attack-mode.sh
#!/bin/bash
##how to use it
#### create .env on this root folder
#### run script using bash script.sh
set -o allexport
source .env
set +o allexport

ACTIVATE_ATTACK_MODE=(`curl -X PUT "https://api.cloudflare.com/client/v4/zones/$CF_ZONE_ID/pagerules/$CF_RULE_PAGE_ID" \
     -H "X-Auth-Email: $CF_EMAIL" \
     -H "X-Auth-Key: $CF_API_KEY" \
     -H "Content-Type: application/json" \
     --data '{"targets":[{"target":"url","constraint":{"operator":"matches","value":"yourdomain.com/*"}}],"actions":[{"id":"browser_check","value":"on"},{"id":"minify","value":{"html":"on","css":"on","js":"on"}},{"id":"security_level","value":"under_attack"}],"priority":1,"status":"active"}' |json_pp)`
References:

Jika kamu merasa tulisan ini bermanfaat & membantu kamu, kamu bisa berdonasi lewat saweria
If you feel this website help you, you can donate at saweria