Webhook? Buat Apa?

Webhook di sini bisa digunakan untuk men-trigger berbagai macam perintah (update aplikasi, backup, membuat instance baru di cloud provider, dll).
Di sini saya menggunakan webhookd dari ncarlier , karena ini yang pertama ketemu ketika saya googling, gampang setup nya dan selama ini belum pernah ada masalah dalam penggunaannya.
Setup Webhookd dengan Binary Executable File
- Download dan jalankan file binary dengan
sudo curl -s https://raw.githubusercontent.com/ncarlier/webhookd/master/install.sh | bash
atau
curl -sf https://gobinaries.com/ncarlier/webhookd | sh
Jalankan dengan
webhookd &Buat 1 file “echo.sh” di /home/namauser/scripts (default folder location nya si webhookd), isikan dengan
#!/bin/sh
echo "test"
Beri permission agar bisa di eksekusi
chmod +x /home/namauser/scripts/echo.shTest dengan
curl localhost:8080/echo.sh
Webhookd dengan Docker
- Pastikan sudah terinstall docker di server, lalu jalankan
 docker run -d --name=webhookd \
  -v ${PWD}/scripts:/var/opt/webhookd/scripts \
  -p 8080:8080 \
  ncarlier/webhookd \
  webhookd --scripts=/var/opt/webhookd/scripts
- Test dengan
curl localhost:8080/echo.sh
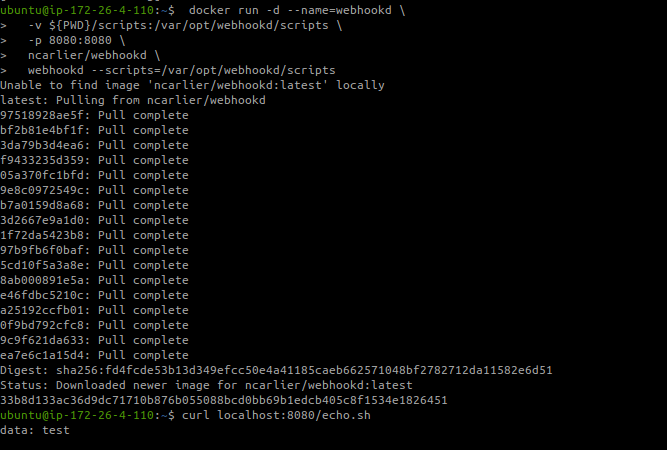
Webhookd Docker
Catatan:
Menjalankan webhookd dengan docker akan mudah, tapi kedepannya akan menemukan kesulitan, untuk kebutuhan-kebutuhan yang membutuhkan otentikasi (anda perlu mount folder .ssh atau folder .config, dll)
Untuk penggunaan lebih mudah, saya sarankan instalasi dengan menggunakan file binary.
Menambahkan Basic Auth di Webhookd
Secara default, tidak ada otentikasi di webhookd. Tapi apabila anda menginginkan otentikasi, webhookd sudah menyediakan opsi otentikasi dengan basic auth.
- Buat file otentikasi dengan
# create passwd file the user 'webhookuser'
htpasswd -B -c ~/.htpasswd webhookuser
- Jalankan webhookd
webhookd -passwd-file ~/.htpasswd
- Test dengan
curl -u webhookuser:passwordloch -X POST localhost:8080/echo.sh
Belum cukup? kita bisa lebih galak lagi ke orang iseng dengan menggunakan config webhookd dengan nginx!
Harden Webhookd dengan Config Nginx
Asumsi saya, anda sudah terbiasa menggunakan nginx dan fail2ban ya, lalu lanjut setup bot blocker dan fail2ban
Pertama silahkan setup config nginx-ultimate-bad-bot-blocker + setup fail2ban nya. Semua ada di situ
Tambahkan ini di bagian nginx virtual host config
server {
  server_name webhook.ipang.my.id;

  # Bad Bot Blocker
  include /etc/nginx/bots.d/ddos.conf;
  include /etc/nginx/bots.d/blockbots.conf;

  #tambahin user agent custom kamu, bebas apa aja
  if ($http_user_agent !~ (tukangbasobawawalkietalkie)) {
  return 403;
  }


  location / {
    # pake auth_basic nya dari nginx aja ya
    # jangan  dari webhookd nya
    auth_basic "restricted content";
    auth_basic_user_file /home/ubuntu/.htpasswd;
    add_header  X-Robots-Tag "noindex, nofollow, nosnippet, noarchive";
    proxy_set_header   X-Real-IP $remote_addr;
    proxy_set_header   X-Forwarded-For $proxy_add_x_forwarded_for;
    proxy_pass         http://localhost:8080/;
    proxy_set_header   Upgrade $http_upgrade;
    proxy_set_header   Connection "upgrade";
  }
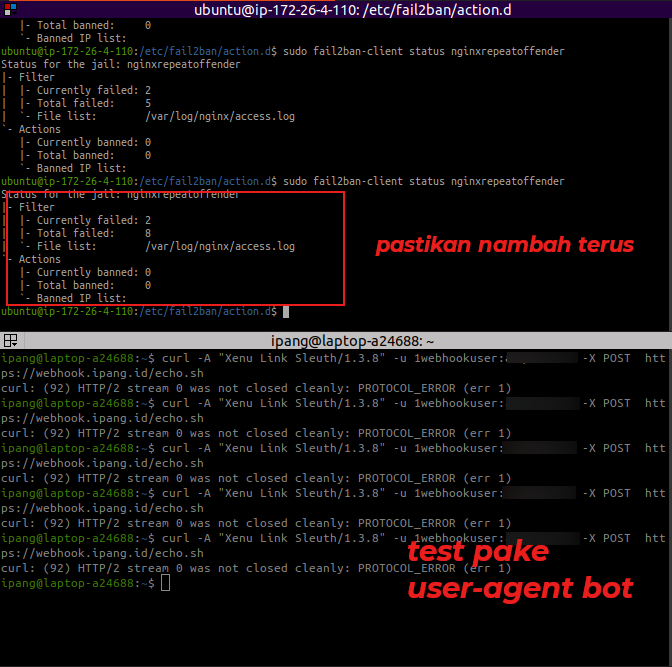
- Test beberapa kali tembak webhook dengan username atau password yang salah, atau dengan menggunakan user-agent asal-asalan. Apabila sudah melebihi “max-retry” nya fail2ban, maka IP anda akan terblokir.
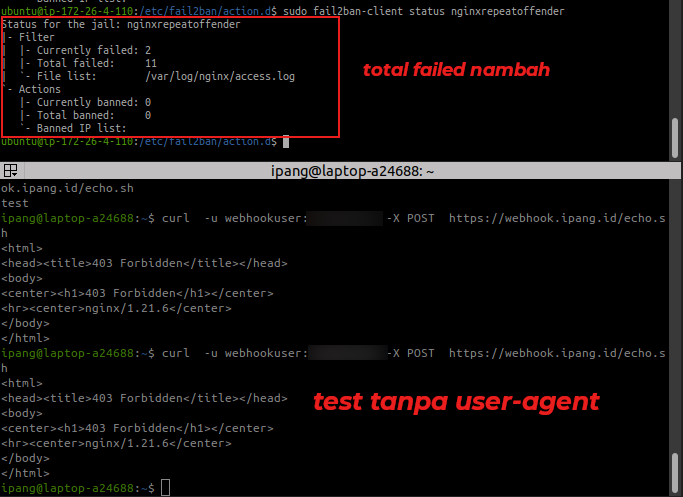
Test Tanpa User Agent
User-Agent Bot
Membuat Custom Service/Systemd Webhookd
- Download latest webhookd
#download file
curl -L -o webhookd.tgz https://github.com/ncarlier/webhookd/releases/download/v1.16.0/webhookd-linux-amd64.tgz
# extract
tar -xvf webhookd.tgz && sudo mv webhookd /usr/bin/
2.Buat file di /etc/systemd/system/webhookd.service
[Unit]
Description=Webhookd Service

[Service]
User=your-username
WorkingDirectory=/home/your-username/scripts/
ExecStart=webhookd --scripts=/home/your-username/scripts/
Restart=on-failure
RestartSec=5
StartLimitInterval=60s
StartLimitBurst=3
Type=simple
TimeoutStartSec=0
RemainAfterExit=yes
StandardOutput=file:/var/log/webhookd/access.log
StandardError=file:/var/log/webhookd/error.log

[Install]
WantedBy=default.target
Reload new service
sudo systemctl daemon-reloadMake it run at start,
sudo systemctl enable webhookd.service && sudo systemctl start webhookd.service
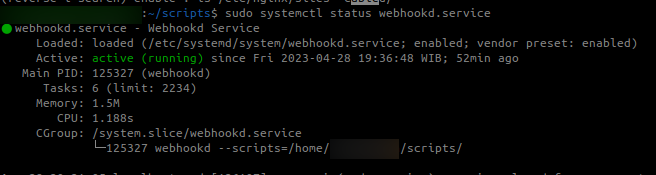
Webhookd Service
Jika kamu merasa tulisan ini bermanfaat & membantu kamu, kamu bisa berdonasi lewat saweria
If you feel this website help you, you can donate at saweria